Security Suite may arrive on a computer through another Trojan infection. On some cases, Security Suite virus is hosted on fake online virus scanner web site and bogus movie web site that pose as a needed program to be able to view online video. Users visiting these sites can be easily contracted with the malware due to its drive-by-download technique. Either way, Security Suite can easily penetrate a computer. At the time of this writing, it was learned that Security Suite virus remains undetected and hidden to legitimate security programs. Perhaps, in the coming days, anti-virus software maker will release an update that includes Security Suite on their definition file.
By this time, Security Suite has already entered on a number of computers and may have pretended like legitimate antivirus software. It was mainly designed to disguise as a security program to attract user. Later, its own scanner will detect a bunch of viruses and prompt victims to remove the threats by purchasing the registered version of Security Suite. A redundant pop-up messages stating that computer is severely infected will never stop annoying users in an effort to convince them more.
Ignore all of its alerts and remove Security Suite malware as soon as possible. You can follow the procedures on this page to get rid of the malware in no time. Also, downloading and scanning the computer with suggested tool may help speed-up computerís recovery from this virus infection.
What are the Symptoms of†Security Suite Infection?
It will modify Windows Registry and add the following entries:
HKEY_CURRENT_USER\Software\Security Suite
HKEY_CURRENT_USER\Software\Security Suite
HKEY_LOCAL_MACHINE\SOFTWARE\SecSuitE
HKEY_CURRENT_USER\Software\Microsoft\Internet Explorer\PhishingFilter “Enabled” = “0”
HKEY_CURRENT_USER\Software\Microsoft\Windows\CurrentVersion\Internet Settings “ProxyOverride” = “”
HKEY_CURRENT_USER\Software\Microsoft\Windows\CurrentVersion\Internet Settings “ProxyServer” = “http=127.0.0.1:5643”
HKEY_CURRENT_USER\Software\Microsoft\Windows\CurrentVersion\Internet Settings “ProxyEnable” = “1”
HKEY_CURRENT_USER\Software\Microsoft\Windows\CurrentVersion\Run “[random characters]”
HKEY_LOCAL_MACHINE\SOFTWARE\Microsoft\Windows\CurrentVersion\Run “[random characters]”
The threat will drop the following malicious files:
%UserProfile%\Local Settings\Application Data\[random characters]\
%UserProfile%\Local Settings\Application Data\[random]\[random characters].exe
Procedure 1: Uninstall Security Suite from Windows Control Panel
1. Begin the removal process by uninstalling the rogue program from Windows. To do this, we need to open Control Panel. Please ensure that you are logon with the Administrative privilege to access this function.
Accessing Control Panel in Windows 8 and Windows 10
- On your keyboard, Press Windows Key + X.
- Once Quick Access Menu appears on the screen, please click on Control Panel.
- Control Panel window will open. Please proceed to the next step which is uninstalling Security Suite.
How to access Control Panel in Windows XP, Windows Vista / 7
- Click on Start button that can be found on bottom left corner of the screen.
- From the list, choose Control Panel to access settings of Windows and make the needed changes.
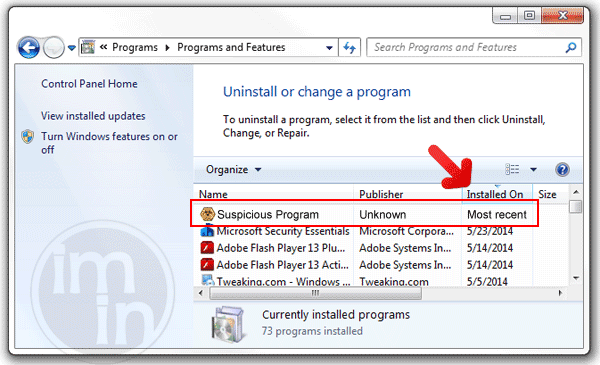
2. To uninstall Security Suite, click on Uninstall a program under Programs Section. It will open a Program and Features window where-in you can uninstall, change, or repair installed software.
3. Look for Security Suite title or any suspicious name that was installed recently. To do this, you need to arrange the items chronologically. Click on Installed On to display recently installed programs.
4. Select Security Suite or any suspicious items and then Click on Uninstall button to remove it from Windows.
5. If it prompts for confirmation, please click OK button to proceed.
Procedure 2: Scan and remove Security Suite files with MalwareFox Anti-Malware
To remove Security Suite, download MalwareFox Anti-Malware. This tool is effective in getting rid of Trojans, viruses and malware.
1. After downloading, please install the program using the default settings.
2. At the end of the installation, please make sure that it will download necessary updates.
3. Once update has completed, MalwareFox will launch.
4. Click on SCAN button from the main window.
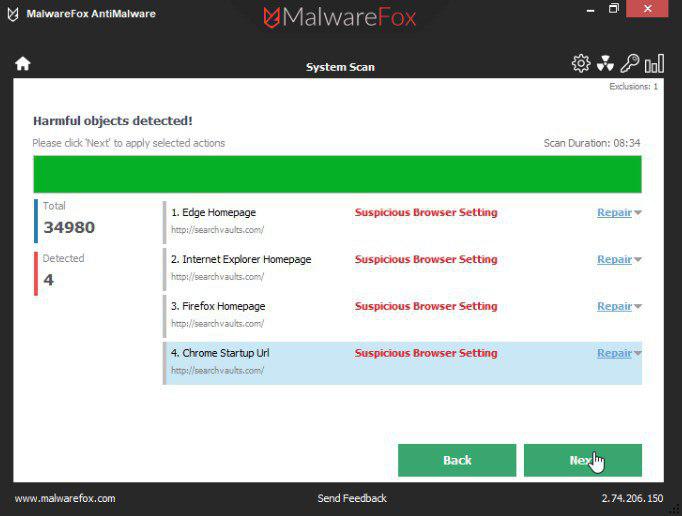
5. MalwareFox will detect all the infections in the computer system and list all the threats.
6. Click Next button to remove all the infections in one click.
Procedure 3: Scan Computer in Safe Mode Using Installed Anti-virus Program
1. When troubleshooting a PC, one common step is to boot operating system into Safe Mode with Networking. The same approach will be used in the removal of Security Suite. Please execute instructions based on your Windows OS version.
Start Windows 8 / Windows 10 in Safe Mode with Networking
- Close all running programs on your computer because we will need to restart Windows on this procedure.
- Press and Hold Shift key on your keyboard while clicking on Restart.
- You will then be presented with Troubleshooting Options.
- Click on Troubleshoot icon.
- Then, Click on Advanced Options icon.
- Select Startup Settings icon and then, Click on Restart button.
- When Windows restarts, it will prompt to choose number from the list of options. Press the number on your keyboard that corresponds to Safe Mode with Networking, commonly number 5.
- Once in Safe Mode, please proceed to the next step which is running a virus scan on the computer.
Start in Safe Mode with Networking (Windows XP / Vista / 7 Instruction)
- Please restart the computer and just before Windows start, press F8 on your keyboard repeatedly. You will be presented with Advanced Options Menu.
- From the selections, choose Safe Mode with Networking. Please use keyboard's arrow up/down to navigate between selections and press Enter to proceed.
2. Once your Windows is running in Safe Mode, open your installed anti-virus programs and update it to the most recent version by automatically downloading necessary updates.
3. Thoroughly scan the computer and remove all identified threats. Do not restart or turn off the computer after the scan process. You still need to run another scan. Please follow the next procedure.
Procedure 4: Run TrendMicro's Anti-Threat Toolkit (ATTK) to check and delete any remnants of Security Suite.
As an added help to remove Security Suite, you can scan the computer with Anti-Threat Toolkit. This software is provided and distributed by TrendMicro. Follow this procedure to run a scan with this tool.
1. Download the package by clicking on the button below. This will launch a new browser window that contains further details about the tool.
2. Save the file to a location on your hard drive.
3. Browse for the location of the file and double-click to run. If you are using Windows Vista or Windows 7, right-click on extracted file supportcustomizedpackage and click on Run as Administrator.
4. When program launch, it will run a command prompt to initialize, prepare components, and update the program.
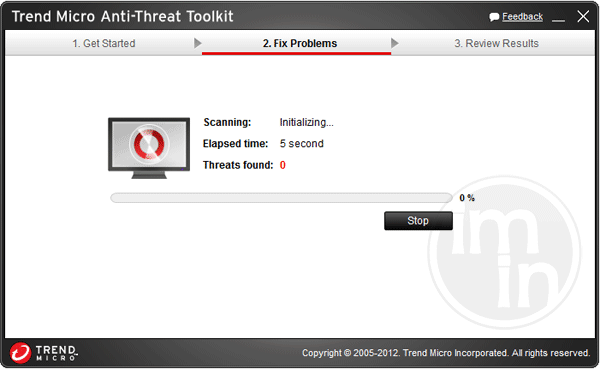
5. Next it will open the graphical user interface (GUI) of Anti-Threat Toolkit.
6. Click on Scan Now. This operation will scan all Security Suite files and processes in your computer and display a list of result for possible Fake Antivirus program and malware that needs to be removed.
7. Tick all items that are detected by the program, and then click Clean. The tool will start removing Security Suite components from the computer.
8. If it asked you to restart Windows, please do so.
Protect your PC from Security Suite or Similar Attack
Turn On Safe Browsing Features
Google Chrome's Protection from Dangerous Sites
With Google Chrome's Dangerous Site Protection feature, you will have lesser risks browsing the web. It will display a warning when the site you are trying to visit is suspicious, thus, you can prevent Security Suite infection. To enable protection from dangerous sites, please do these steps:
1. Open Google Chrome.
2. In the address bar, type this: chrome://settings/ and then, Press Enter.
3. Once on the settings page, click on Show advanced settings... at the bottom of the page to see the rest of the Chrome setup.
4. Locate Privacy section and mark 'Protect you and your device from dangerous sites'.
5. Please restart Google Chrome. New settings keep your browser safe while surfing the web.
Internet Explorer - Activate SmartScreen Filter
Internet Explorer versions 8 and 9 has this feature called SmartScreen Filter. It helps detect phishing web sites and protect you from downloading malicious programs including Security Suite. To turn on SmartScreen Filter, follow these steps:
1. Please open Internet Explorer.
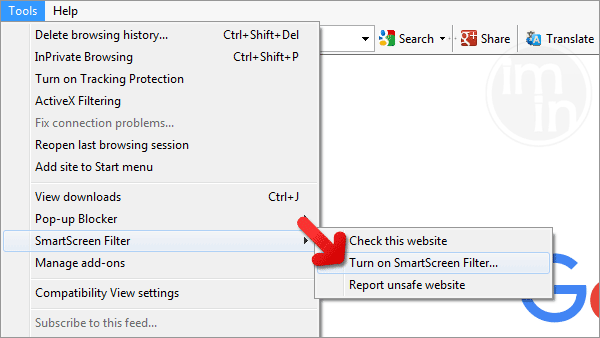
2. On top menu, select Tools (IE 9). For IE 8, please look for Safety menu.
3. Select SmartScreen Filter from the drop-down list and click on Turn on SmartScreen Filter.
4. Please restart Internet Explorer.
Mozilla Firefox - Block Attack Sites and Web Forgeries
Phishing and Malware Protection is a built-in feature on Firefox version 3 or later. It warns you when a page you are trying to visit contains phishing content or an attack site designed to drop threats such as Security Suite. To help you keep safe while browsing the Internet using Firefox, please follow this guide:
1. Open Mozilla Firefox browser.
2. On top menu, click on Open Menu. Then select Options from the list.
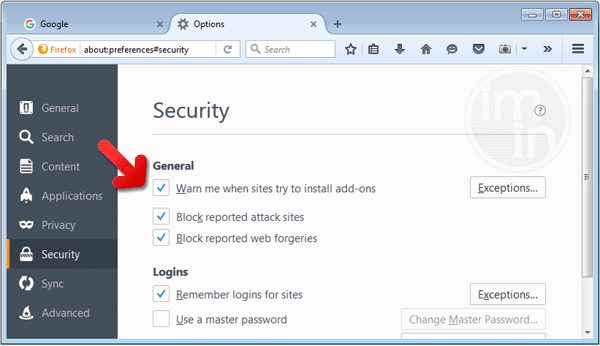
3. Select Security and put a check mark on the following items:
- Warn me when sites try to install add-ons
- Block reported attack sites
- Block reported web forgeries
Edge Browser - SmartScreen Filter
SmartScreen filter is a built-in feature in Microsoft Edge browser that can help you deter malicious programs such as Security Suite. It can block malicious web sites and downloads.
1. Open Microsoft Edge browser.
2. Click on More Actions button located at top right corner of the screen.
3. Select Settings from the drop-down list.
4. Under Settings menu, go to Advanced Settings section and click on View Advanced Settings.
5. Scroll down to "help protect my PC from malicious sites and downloads with SmartScreen Filter". Turn it to ON.
6.You may now restart Microsoft Edge browser.


